

This post was originally from designadobe.wordpress.com, a website created for a basics to WordPress and Joomla course at Chestnut Hill College, PA.
InDesign is known out of all the Adobe Suite programs to be the text editor; however Photoshop and Illustrator also are great character and paragraph formatting programs. To find out more about character formatting, click here to see my tutorial from last week. Paragraph formatting is a powerful tool and when used properly can give users the options for alignments, indents, spacing, hyphenations, and more. So today I will be talking specifically about paragraph formatting through the Paragraph Window.
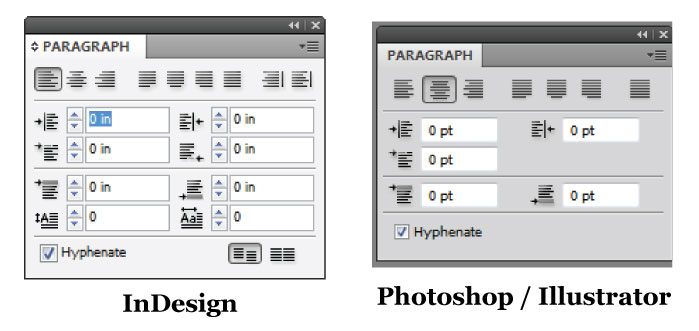
ACCESSING THE PARAGRAPH WINDOWS
Accessing the paragraph window within each program varies, but here is how to access them:
- InDesign- Windows > Type & Tables > Paragraph
- Photoshop- Windows > Paragraph
- Illustrator- Windows > Type > Paragraph
When using the Type Tool you can also easily access the paragraph settings, through the Control (AKA Options) Window. Here are some images and instructions how to get the paragraph settings within the control window for InDesign and Illustrator. Please NOTE that Photoshop does not offer a paragraph setting option within the control window.

When accessing the control window in Illustrator, while having the type tool selected you can just click the blue link on the control window that says Paragraph (squared in the red above). This will give you the same exact window as if you were using the normal popup paragraph window.

Accessing the paragraph settings within the control window in InDesign includes an additional step. First, Make sure you have the type tool selected and then click the paragraph symbol (¶) on the left of the window to access all of the paragraph formatting options from the paragraph window. This control window paragraph for InDesign also lets you access a few of the normal character window settings as well while editing.
MAIN FUNCTIONS
Photoshop, Illustrator, and InDesign all share several main functions for paragraph formatting, however InDesign as the main Adobe text editor includes several more and they are explained in the InDesign Only Functions section below.
Before you start with paragraph formatting of course you need text to edit. If you need help with creating a text box check out my tutorial on custom text boxes, here.
To apply any of these options select the type tool, then your text box.
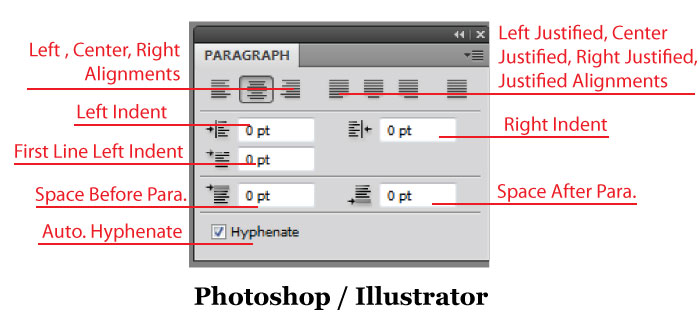
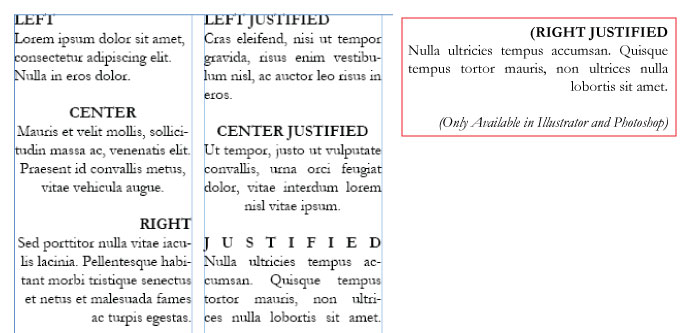
Text Alignment: Overall there are seven options for text alignment within the three programs, they are: Left, Center, Right, Left Justified, Center Justified, Right Justified (ONLY available in Illustrator and Photoshop), and just Justified. Each of these options vary the way the text is aligned and can change the look of your document drastically. Typically in newspaper alignment Left Justified is used, while in other things like school papers just plain Left is used. To use any of these just click on their little icons, if your not sure which is what setting place your curser over it and a screen tip should pop up. Here is an example of what each look like:
Indents (Left / Right): Left Indent bumps the whole selected text paragraph to the left, creating a small border around the left of the text. The Left Indent is helpful when you possibly are using block quotes within InDesign. The Right Indent does the exact same thing but pushes the text to the right. An example of what happens is below. To apply this just select the paragraph and type the amount of space for the indent you would like to use within the space next to the label (shown above).
First Line Left Indent: Similar to a tab, the First Line Left Indent can, when a number is entered into its selection format like the name of the function says the first line of the paragraph to the left. This basically just indents, show below, and increases readability distinguishes one paragraph from another. Like every other function just select the text and apply it to said text.
Space Before / After Paragraph: The Adobe Suite offers a handy thing that saves you from having to add space before and after paragraphs manually. If you use the Space Before / After Paragraph options all you do it enter in a number of inches, while the paragraphs are selected, and voila it adds it for you! This tool is especially handy if you are formatting a large book or other text within InDesign, and are able to use the paragraph styles which basically saves your paragraph formatting for you. I’ll be doing a tutorial on paragraph and character styles soon.
Hyphenation: To hyphenate or not to hyphenate is the question? Hyphenation breaks words up within your paragraph to decrease the amount of space between each letter. Not hyphenating leads to longer paragraphs, due to space being forced to insert between the words. Below you can see this, the paragraphs are both left justified. The one within the Left Indent section is hyphenated, making it look clean. While the Right Indent section is not hyphenated this leaves extra spaces between each word. Paragraphs are automatically hyphenated, to undo this un-click the check mark next to hyphenate while you have the text selected and that paragraph will no longer be hyphenated.

INDESIGN ONLY FUNCTIONS

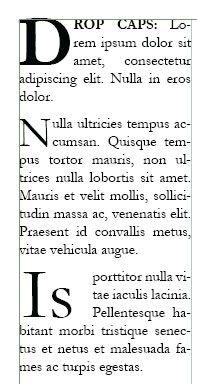
Drop Caps: In old style text, and sometimes in text books you can find Drop Caps. Essentially a drop cap is the first letter of the first paragraph for a new chapter or section. InDesign gives users the option to do this within the Paragraph Window, giving you two functions to accomplish this: Drop Cap Number of Lines and Drop cap One or More Characters. The first function, Drop Cap Number of Lines, decides how tall the drop cap will end up being. Just type in how many lines while selecting the letter and you have a drop cap. For instance, users will most likely use a drop cap that is three or more lines tall (example right). While as well some users might want to included the whole word, for this you would use the Drop Cap One or More Characters function. This is sometimes used if the first word is “it”, “or”, “so”, etc. To do this just enter the number of characters or letter into the space next to the function. Also to apply drop cap settings selecting text is not required, all you need to do is place your curser in front of the first word of the paragraph. Adding a drop cap is a nice accent to a book or magazine type publication, and also adds a nice break in the text.
Aligning to Baseline Grid: Aligning to a baseline grid allows paragraphs and other text objects to consistently be equal within a page. This align tool realigns all text to the Baseline Grid, which looks and feels like lined paper. To access the baseline grid go to View > Grids & Guides > Show Baseline Grid.
I hope this helps you understand paragraph formatting! Within the next several weeks I will also talk about paragraph and character styles, which will basically short cut using these functions. Here are a few tutorials for your enjoyment:
johnsonl12013
Andrea–I am sorry I am so far behind in my reading. This is an excellent tutorial, and, to me, it really is worth the massive amount of time it takes to create each tutorial. You hit on all the important points, you include some very helpful links, especially your internal link. Thanks!
designadobe
Thanks Linda!