

This post was originally from designadobe.wordpress.com, a website created for a basics to WordPress and Joomla course at Chestnut Hill College, PA.
Creating a new document might be difficult for some individuals, and here is a hopefully quick and easy explanation on how to do so within InDesign.
In my previous tutorial InDesign: The Startup Screen you learned the many functions of the helpful startup screen. One of those functions within the create new section is creating a new document, and once you click that a window opens. You can access this window through clicking document in the startup screen, but also through the key board shortcut Ctrl + N (Windows) or Command + Option + N (Mac). You can also just go to File > New > Document. And the window below will appear:
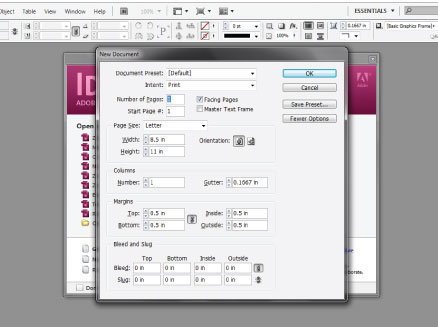
Within this window there are initially four sections, but if you press more options a fifth section will show (this is displayed in the image above). Below I will explain in detail which each of these sections do and how they change the document set up.
DOCUMENT PRESETS
Document Preset: Within InDesign you can create a preset in which you can use for multiple document setups. To access these preset you would click the drop down list that says [Default]. You can also save a preset by pressing save preset on the right of the screen. This will prompt another window asking you to name the preset, make sure before you do this to make all the changes to the New Document window.
Intent: Typically there are two intents for an InDesign file, print or web. If you switch the drop down to web all of the file size options will change to pixels, a form of measuring for the web. Whereas the print option uses inches.
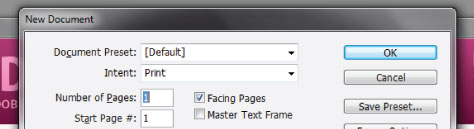
Number of Pages: The number of pages can vary from 1 to exactly 9,999. But I suggest if your going to make a document with over 100 or more pages to create book file which combines document files together (click here to learn more about books from Adobe). Even if you have 50 pages you might prefer a book document.
Start Page #: If your document is going to be part of a book document, you might want to start on page 100 rather than 1. By typing 100 into the start page # box, your page number when applied to the pages will begin their instead of on 1 again.
Facing Pages: When you read a book the pages are setup to face one another. This is what the Facing Pages function of the new window document creates. By checking this the document pages end up formatting if they are a book and show two up when you scroll through. If you uncheck this option you will end up with just one page showing as your scroll through, like a word document. This is also helpful when exporting for print because it will automatically format for printing a document with facing pages.
Master Text Frame: Master Text Frame basically just adds a text box within your master pages. However, this feature is really not necessary if you add a text box to your master page as is. Here is a short article talking about Master Text Frames. If you are interested more about Master pages they are basically templates that you can set up within InDesign for certain pages, I will be doing a tutorial on them soon.
At the end of this tutorial I will post an example. This example will include the following formats from this section: 1 page, with facing pages, starting the page numbering at 1, and setting it up for print.
PAGE SIZE

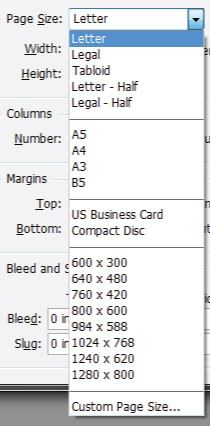 Page Size: Page Size can vary from Letter to Tabloid. InDesign has several preset page sizes (seen to the left). However you can also use the Width and Height options to create your own custom page size. As well, you can save a custom page size by clicking Custom Page Size. An additional pop up window will appear prompting you to name it.
Orientation: There are also the two typical orientation types Portrait and Landscape. Portrait is on a typical 8.5 x 11, is and 8.5 x 11. But a Landscape just rotates it long ways so it is 11 x 8.5.
For the example I will be doing a newsletter on Legal size paper, with it facing portrait.
COLUMNS
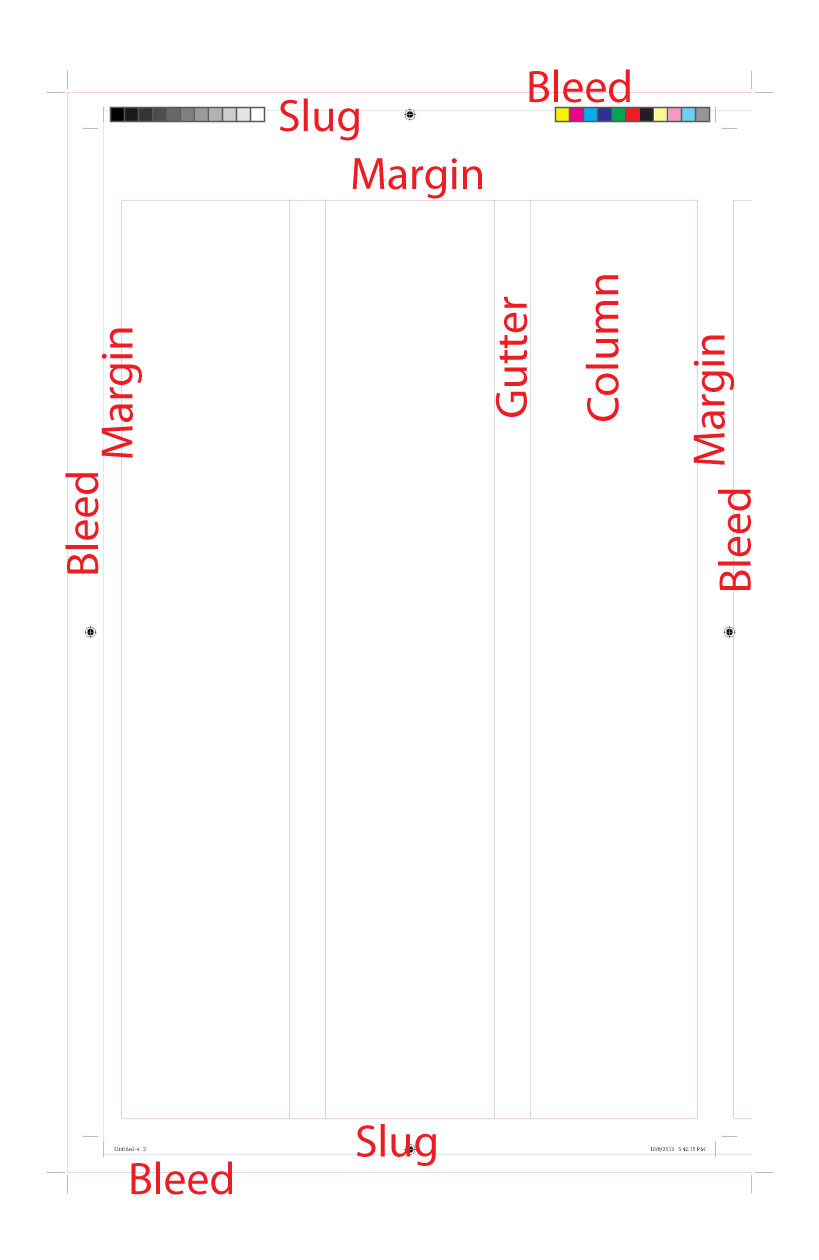
With documents, especially if you are creating newsletters or a newspaper, columns are important to add. You can easily add a number of columns, and you can have exactly 216 if you like. Columns create spacing and are a great way to organize a document. With newsletters I suggest two to four columns, and with newspapers I suggest at least five.

Within the column area is also a space to change the Gutter which is the space between each column. The standard is 0.1667 inch but you can go as high as 20 inches. I suggest using the standard and no more than 1 inch.
For the example I will be using three columns with a 0.5 in gutter.
MARGINS

Margins are a necessity when doing a printed document, and go around the whole entire page creating a border of space. The standard margin is 0.5 in, but they are capable of being as large as 138.8 inches wide. I suggest never going smaller than a 0.25 margin on a page for printing reasons. Margins for the page can also vary per side, all you need to do is unclick the little link in the center of the margin section. If it is not selected the link will appear broken.
For the example I will have a Top margin of 1 inch, and a Bottom, Inside and Outside of 0.25 inch.
BLEED and SLUG

To access the Bleed and Slug section you must click more options at the upper right hand side of the New Document Window.
The Bleed and Slug are basic printer marks that are trimmed off once a document is printed and prepared. To add these options you must enter a number into the text input boxes next to each item. A basic bleed adds additional room past the margin to the page, while a slug adds printing information like colors etc. Click here for additional information from Adobe on bleeds and slugs.
In the example below I have used a bleed of 0.5 inch throughout, and a slug of 0.25 on top and bottom of the page.
Here is a document with the setup I discussed throughout this tutorial:
To turn on the markers for printing like I did (this doesn’t included the labels I added) you must go to File > Print, then within the Print page click Marks and Bleed on the left options tabs. Here Check off All Printer’s Marks, or the ones you would like to see.
Here are some additional tutorials on setting up a document: